FoyCom Overview
It's not any regular eCommerce platform but an eCommerce platform along with the ERP solutions integration. Not only does it manage your eCommerce store, but also efficiently handle operations for Order, Inventory, Delivery, Invoicing, Finance, CRM, Manufacturing, Reporting, and what not.
Efficiently operate your online store and manage back-office operations as well.
FAQ
No, there are no setup fees.
No, you can use FoyCom for 15 days using the signup option without providing any payment details.
Yes, You can change your subscription plan as per your business requirements
Website
Update the Store Title And Configure Store Theme
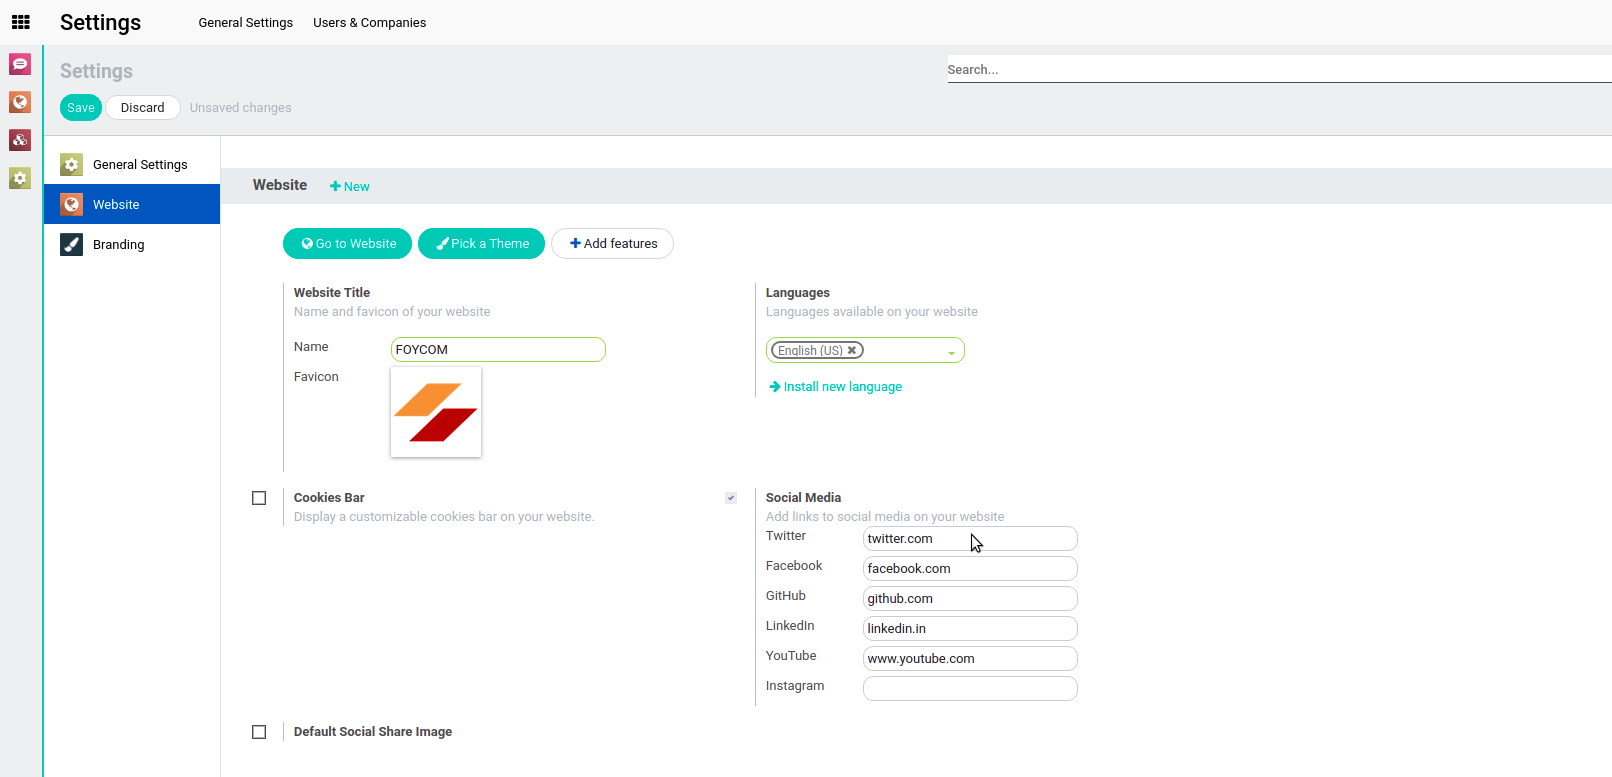
To change the Website Title, Go to Website -> Configuration -> Settings -> Website Title.
Change themes in a few clicks, and browse through FoyCom's catalog of ready-to-use themes available in our app store.
To pick a theme, Go to Website -> Configuration -> Settings -> Pick a Theme.

Upload Store Logo
Go to -> Website -> Go To Website -> Edit the page -> on click of YOUR WEBSITE upload your store logo.

Setup the Social Pages
You can manage your social media with FoyCom.
Go to Website -> Configuration -> Settings -> Check Social Media -> Fill the details.
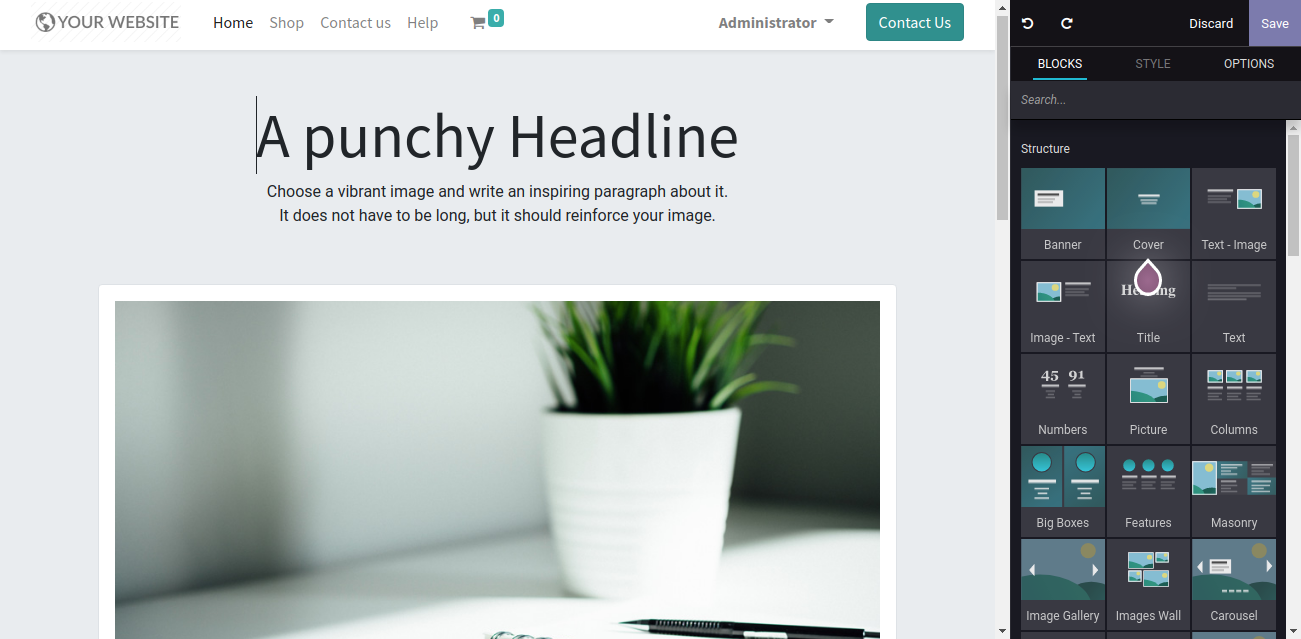
Create the Attractive Home Page & Other Pages with Page Builder
You can make attractive pages with the in-built widgets only by drag and drop.
Enable Blog
Creating Blogs on website is very easy with FoyCom.
Go to Website -> New -> Blog Post.

E-Commerce
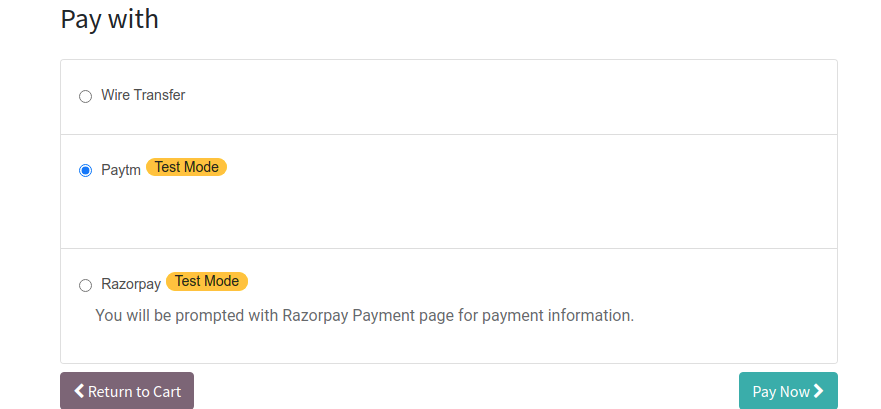
Payment Acquirer configuration Paytm/RazorPay
Open Payment Acquirer from Website -> Configuration, set the configuration as given below.

On the order checkout page you have the option to select payment option.
Publish product on website
To publish your product on a website Go to website -> Products -> Go to Website.
Product
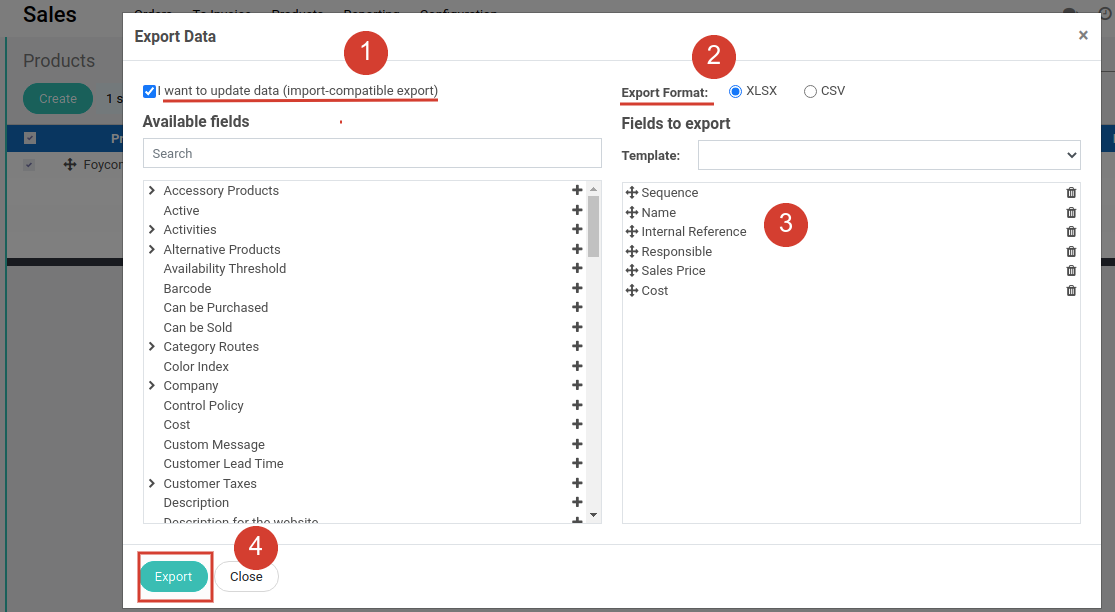
How to Export products
Export products from the products list view
-
Select the products which you want to export
-
Click on Action -> Export
-
It will show you the popup you can select the products fields from the list which you want to export the data
-
If you want to import that data after doing some changes then please check mark on I want to update data (import-compatible export)
-
Choose Export format(file format) type Excel or CSV
-
Clicking on the Export button will give you data in the respective file format.
-
How to import Products with Categories and Variants
Import templates are provided in the Import Tool of the most common data to import (contacts, products, bank statements, etc.). You can open them with any spreadsheet software (Microsoft Office, OpenOffice, Google Drive, etc.).
How to customize the file
-
Remove columns you don’t need. However, we advise you to not remove the ID column (see why below).
-
Set a unique ID to every single record by dragging down the ID sequencing.
-
Don’t change the labels of columns you want to import. Otherwise, FoyCom won’t recognize them anymore, and you will have to map them on your own in the import screen.
-
Feel free to add new columns, but the fields need to exist in FoyCom. If FoyCom fails in matching the column name with a field, you can match it manually when importing by browsing a list of available fields.
Remove columns you don’t need. However, we advise you to not remove the ID column (see why below).
Set a unique ID to every single record by dragging down the ID sequencing.
Don’t change the labels of columns you want to import. Otherwise, FoyCom won’t recognize them anymore, and you will have to map them on your own in the import screen.
Feel free to add new columns, but the fields need to exist in FoyCom. If FoyCom fails in matching the column name with a field, you can match it manually when importing by browsing a list of available fields.
Why an “ID” column?
The ID is a truly unique identifier for the line item. Feel free to use one from your previous software to ease the transition into FoyCom.
Setting an ID is not mandatory when importing, but it helps in many cases:
-
Update imports: you can import the same file several times without creating duplicates.
-
Import relation fields (see here below).
Update imports: you can import the same file several times without creating duplicates.
Import relation fields (see here below).
How to import relation fields
A FoyCom object is always related to many other objects (e.g., a product is linked to product categories, attributes, vendors, etc.). To import those relations, you need to import the records of the related object first from their own list menu.
You can do this using the name of the related record or its ID. The ID is expected when two records have the same name. In such a case, add ” / ID” at the end of the column title (e.g., for product attributes: Product Attributes / Attribute / ID).
Create product
You can add or update information about a product such as its price, variants, and availability from the Products page in your FoyCom.
Add a new productGo to Sales -> Product -> Product menu
Click on Create button
Enter the products details
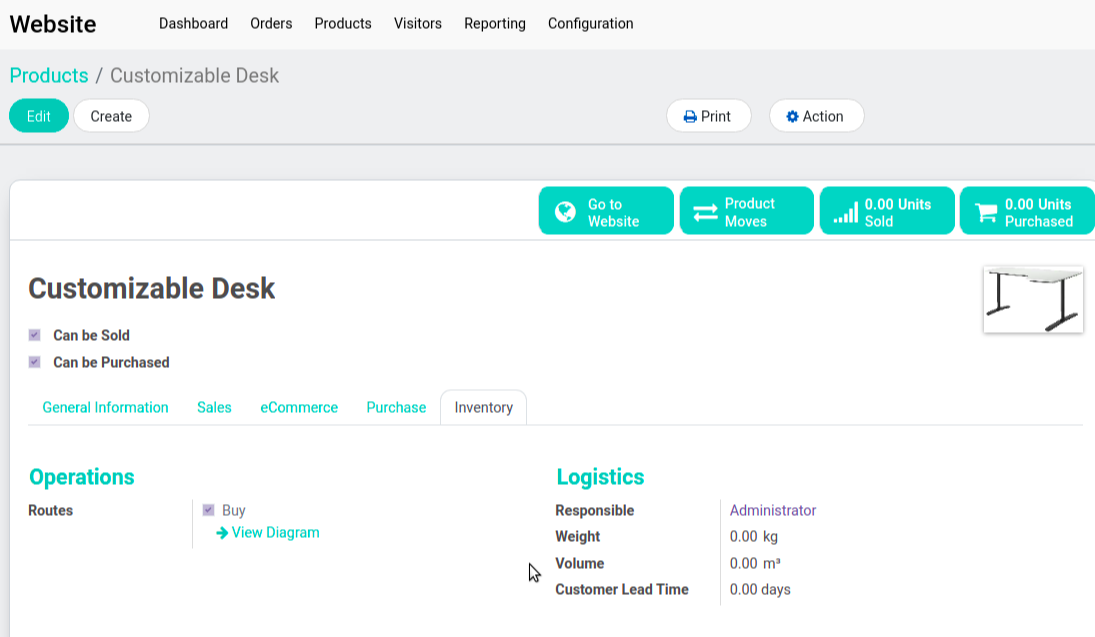
Enter General information like Product type, Barcode, Internal Reference, Units of measure, Sales price, Cost, Add image, etc...
If product have variants then choose the different variants from the Variants tab
Set website categories in eCommerce tab
Add vendor price details in Purchase tab
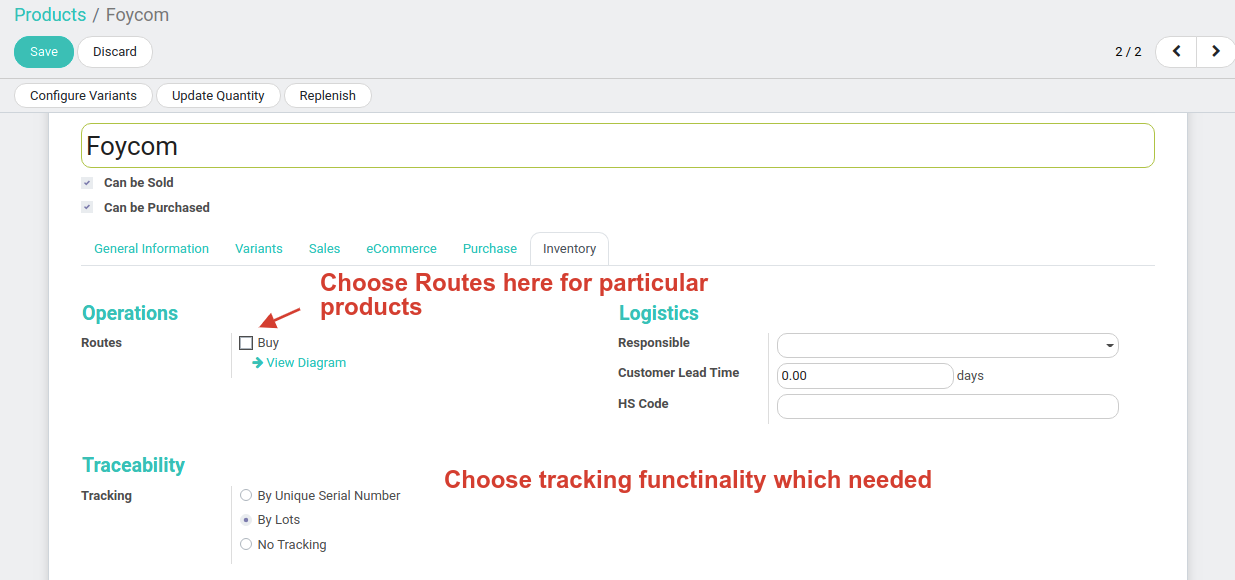
Enter the tracking info, Routes in inventory tab
After all data is added, Click on Save the product.
Go to Sales -> Product -> Product menu
Click on Create button
Enter the products details
Enter General information like Product type, Barcode, Internal Reference, Units of measure, Sales price, Cost, Add image, etc...
If product have variants then choose the different variants from the Variants tab
Set website categories in eCommerce tab
Add vendor price details in Purchase tab
Enter the tracking info, Routes in inventory tab
After all data is added, Click on Save the product.
Product Configuration
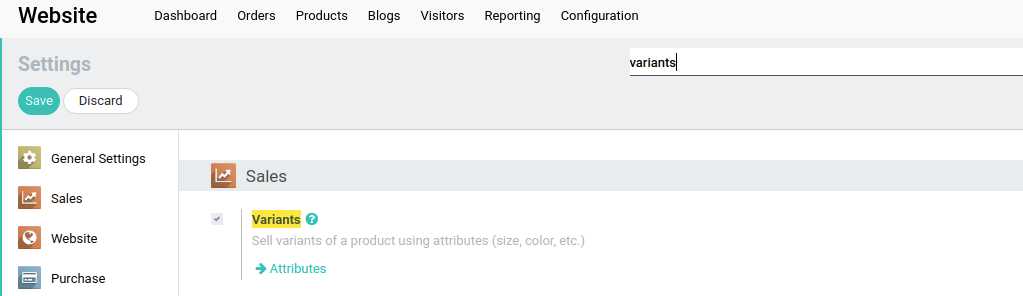
Activate the variant feature
Before you can use product variants, you must first activate the product variants in the settings. To do so, you must go to the Sales app. In the menu Configuration ‣ Settings , locate the Products Variants line, and tick the option Products can have several attributes , then click on Apply .
Creating products with variants
Once you have activated the variant option, you can add variants to your products. To do so, go to the Sales module, Sales ‣ Products. It is also accessible from the Purchase and inventory modules.
Now, click on the product you wish to add variants to.
In the product page, a new tab called Variants has appeared. The number in purple written on top is the number of variants this product currently has. To add new variants, click on the tile. In the new window, click on Create.
In Attributes, click on the rolldown menu and select the type of variance you wish to add. If the variant does not yet exist, you can create it on the fly by clicking on Create and edit…, also can set attribute values same as the attributes.

You can add a cost for the variant on the fly by adding it in the Attribute Price Extra field, or choose to modify it later. Click on Save.
You can also add a different barcode and internal reference to the variant.
When you have entered all the specifications of the variant, click on Save.
Managing Product Variants
Introduction
The examples below are all based on this product template that has two variant attributes :
-
T-Shirt B&C
-
Color: Red, Blue, White
-
Size: S, M, L, XL, XXL
T-Shirt B&C
-
Color: Red, Blue, White
-
Size: S, M, L, XL, XXL
Setting a price per variant
You can add a cost over the main price for some of the variants of a product.
Once you have activated the variant option, you can add variants to your products. To do so, go to the Sales module, open Sales ‣ Products and click on the product you want to modify. Click on the Configure Variants button to access the list of variant values. 
Click on the variant name you wish to add a value to, it will open the record, to make the 3 fields editable. In the Attribute Price Extra field, add the cost of the variant that will be added to the original price
When you have entered all the extra values, click on Save.
Manage Product Using product variants
Product variants are used to manage products having different variations, like size, color, etc. It allows managing the product at the template level (for all variations) and at the variant level (specific attributes).
As an example, a company selling t-shirts may have the following product:
-
B&C T-shirt
-
Sizes: S, M, L, XL, XXL
-
Colors: Blue, Red, White, Black
-
In this example, B&C T-Shirt is called the product template and B&C T-Shirt, S, Blue is a variant. Sizes and color are attributes.
The above example has a total of 20 different products (5 sizes x 4 colors). Each one of these products has its own inventory, sales, etc.
Impact of variants
-
Barcode:
the code and barcode is associated to a variant, not the template. Every variant may have its own barcode / SKU.
-
Price: every product variant has its own public price that is computed based on the template price ($20) with an optional extra for every variant (+$3 for color red). However, you can define pricelist rules that apply on the template or the variant.
-
Inventory: the inventory is managed by product variant. You don’t own t-shirts, you only own “T-shirts, S, Red”, or “T-Shirts, M, Blue”. For information purposes, on the product template form, you get the inventory that is the sum of every variant. (but the actual inventory is computed by variant)
-
Picture: the picture is related to the variant, every variation of a product may have its own primary picture.
-
Other fields: most of the other fields belong to the product template. If you update them, it automatically updates all the variants. (example: Income Account, Taxes)
Barcode:
the code and barcode is associated to a variant, not the template. Every variant may have its own barcode / SKU.
Price: every product variant has its own public price that is computed based on the template price ($20) with an optional extra for every variant (+$3 for color red). However, you can define pricelist rules that apply on the template or the variant.
Inventory: the inventory is managed by product variant. You don’t own t-shirts, you only own “T-shirts, S, Red”, or “T-Shirts, M, Blue”. For information purposes, on the product template form, you get the inventory that is the sum of every variant. (but the actual inventory is computed by variant)
Picture: the picture is related to the variant, every variation of a product may have its own primary picture.
Other fields: most of the other fields belong to the product template. If you update them, it automatically updates all the variants. (example: Income Account, Taxes)
Should you use variants?
When should you use variants?
Using variants has the following impacts:
-
eCommerce:
in your online shop, the customer will only see product templates in the catalog page. Once the visitor clicks on such a product, he will have options to choose amongst the variants (colors, sizes, …)
-
Manufacturing: Using variants allows defining only one bill of material for a product template and slight variations for some of the variants. Example: instead of creating a Bill of Material for “T-shirt, Red, S”, you create a bill of material for “T-shirt” and add some lines that are specific to the dimension S, and other lines specific to the color Red.
-
Pricing:
The default price of a product is computed using the price of the product template and add the optional extra price on each dimension of the variant. This way, variant prices are easier to maintain since you don’t have to set the price for every variant. However, it’s possible to create pricelist rules to fix price per variants too.
eCommerce:
in your online shop, the customer will only see product templates in the catalog page. Once the visitor clicks on such a product, he will have options to choose amongst the variants (colors, sizes, …)
Manufacturing: Using variants allows defining only one bill of material for a product template and slight variations for some of the variants. Example: instead of creating a Bill of Material for “T-shirt, Red, S”, you create a bill of material for “T-shirt” and add some lines that are specific to the dimension S, and other lines specific to the color Red.
Pricing: The default price of a product is computed using the price of the product template and add the optional extra price on each dimension of the variant. This way, variant prices are easier to maintain since you don’t have to set the price for every variant. However, it’s possible to create pricelist rules to fix price per variants too.
When should you avoid using variants?
Using variants may add a level of complexity on the way you use FoyCom. You should consider using variants only if you need it to reduce the complexity of managing lots of products that are similar.
As an example, importing your initial product catalog is more complex if you use variants. You can’t just import a list of products, you must import product templates and all their related variations.
In addition to that, you should also carefully select the dimensions that you manage as separate product templates and those as variants. As an example, a company having these products:
-
Quality: T-Shirts, Polos, Shirts
-
Color: Red, Blue
-
Size: S, M, L, XL
Quality: T-Shirts, Polos, Shirts
Color: Red, Blue
Size: S, M, L, XL
In such a use case, you could create 1 template with three dimensions of variants (Layout, T-Shirts, Polos). But, it’s recommended to create two different product templates as T-shirts may highly differ from polos or shirts and customer expect to see these as two different products in the e-Commerce:
-
Product Template: T-shirt
-
Color: Red, Blue
-
Size: S, M, L, XL
-
Product Template: Polos
-
Color: Red, Blue
-
Size: S, M, L, XL
Product Template: T-shirt
-
Color: Red, Blue
-
Size: S, M, L, XL
Product Template: Polos
-
Color: Red, Blue
-
Size: S, M, L, XL
Inventory Management
Location Management
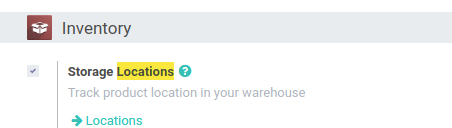
Multiple location enable from the Inventory -> Configuration -> Settings
A Warehouse is the actual building/place in which your items are stocked. You can setup multiple warehouses and create moves between warehouses.
A
Location
is a specific space within your warehouse. It can be considered as a sublocation of your warehouse, as a shelf, a floor, an aisle, etc. Therefore, a location is part of one warehouse only and it is not possible to link one location to multiple warehouses. You can configure as many locations as you need under one warehouse.
There are 3 types of locations:
-
The Physical Locations are internal locations that are part of the warehouses for which you are the owner. They can be the loading and unloading area of your warehouse, a shelf or a department, etc.
-
The Partner Locations are spaces within a customer and/or vendor’s warehouse. They work the same way as Physical Locations with the only difference being that you are not the owner of the warehouse.
-
The Virtual Locations are places that do not exist, but in which products can be placed when they are not physically in an inventory yet (or anymore). They come in handy when you want to place lost products out of your stock (in the Inventory loss ), or when you want to take into account products that are on their way to your warehouse ( Procurements ).
The locations are structured hierarchically. You can structure your locations as a tree, dependent on a parent-child relationship. This gives you more detailed levels of analysis of your stock operations and the organization of your warehouses.
Depending on factors such as the type of items you sell, the size of your warehouse, the number of orders you register everyday… the way you handle deliveries to your customers can vary a lot.
FoyCom allows you to handle shipping from your warehouse in 3 different ways:
-
One step (shipping):
Ship directly from stock
-
Two steps (pick + ship):
Bring goods to output location before shipping
-
Three steps (pick + pack + ship):
Make packages into a dedicated location, then bring them to the output location for shipping

One step (shipping):
Ship directly from stock
Two steps (pick + ship):
Bring goods to output location before shipping
Three steps (pick + pack + ship):
Make packages into a dedicated location, then bring them to the output location for shipping
For companies having a rather small warehouse and that do not require high stock of items or don’t sell perishable items, a one step shipping is the simplest solution, as it does not require a lot of configuration and allows to handle orders very quickly.
Using inventory methods such as FIFO, LIFO and FEFO requires at least two steps to handle a shipment. The picking method will be determined by the removal strategy, and the items removed will then be shipped to the customer. This method is also interesting if you hold larger stocks and especially when the items you stock are big in size.
The three steps system becomes useful in more specific situations, the main one being for handling very large stocks. The items are transferred to a packing area, where they will be assembled by area of destination, and then set to outbound trucks for final delivery to the customers.
Create location for the warehouse
When you create a warehouse, one
Internal
location is created by default.

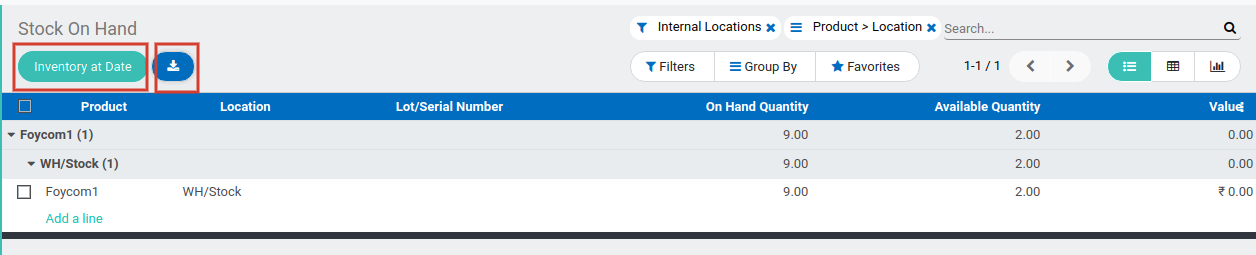
Export Current Inventory
Open the Inventory, Reporting -> Inventory Report
You have 2 options to get inventory:
1. Export current stock as get in report
2. Export Inventory at date in report
Import Inventory
Open the Inventory, Reporting -> Inventory Report
Select the product line which you want to update, Click on action -> export
Choose import compatible and export fields with inventory quantity
Update the details and import it from Favorites -> Import Records
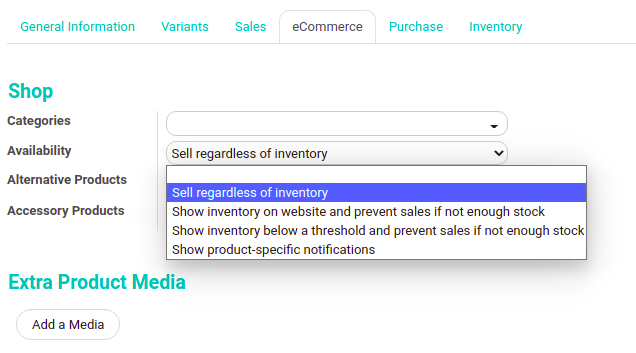
Hiding out-of-stock products
Open the Product, eCommerce tab
Select the appropriate availability to handle the product.
Inventory Adjustment
If you create a new warehouse, you might already have an existing inventory in it. In that case, you should create an inventory in FoyCom. If this is not the case, you can skip this step.
Into the inventory application, select
the Inventory -> Operations ->
Inventory Adjustment
Create
Inventory Adjustment for the products, locations then click on save and
Start Inventory
button

You will be able to input your existing products in the new window. Select add an item and indicate the Real Quantity available in the warehouse. The theoretical quantity can not be changed as it represents a computed one from purchase and sales orders.
If many products have to adjust quantity then select all lines export it, changed quantity and import it.

After quantity updated Validate inventory then you can see the inventory adjusted.
Inventory transfers
Create an internal transfer:
The final step is to create your internal transfer. If you want to transfer eight units of a product from your first warehouse to another one, proceed as follows:
From your dashboard, select an internal movement of one of the two warehouses. To do so, click on
Manage -> Planned Transfer
.
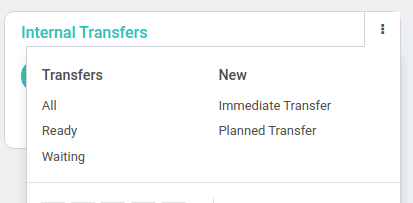
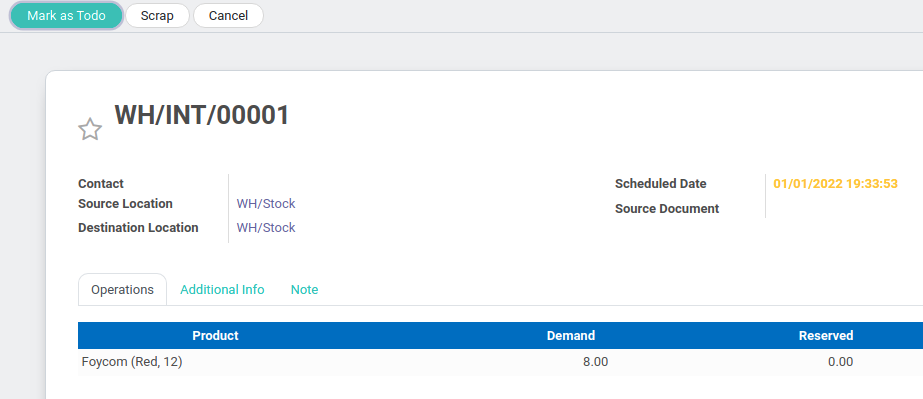
If you have selected Immediate Transfer, FoyCom processes the transfer automatically after you click on Validate.
If you select
Mark as TODO
, FoyCom puts the transfer in
Waiting Availability
status. Click on
Reserve
to reserve the number of products in your source warehouse.
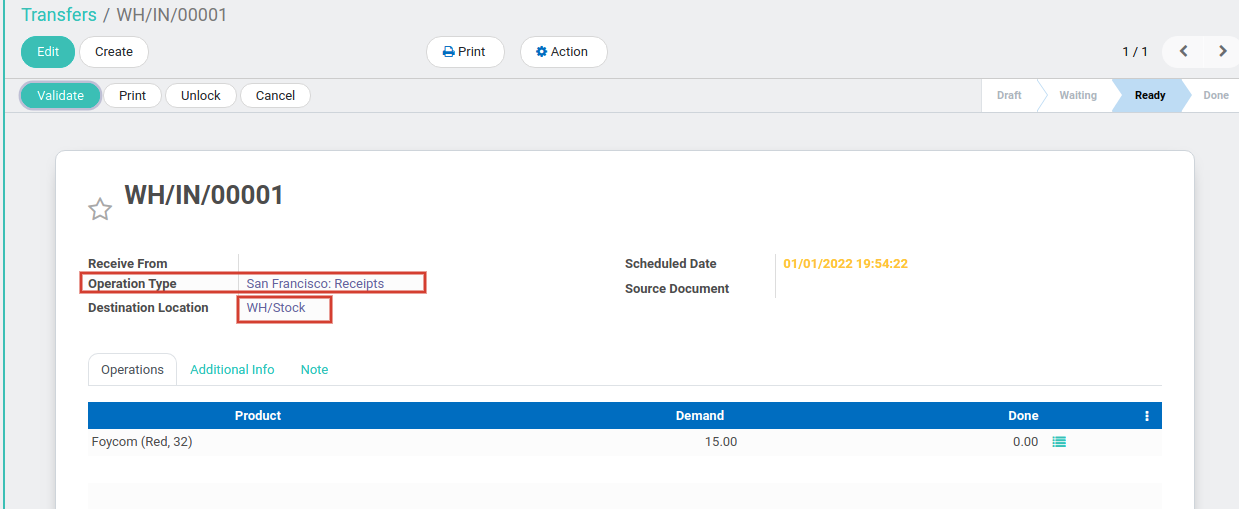
Delivery Order:
When delivering a product, you have to select the source location if it is different from the one initially set on the transfer. Then, you can Mark as todo and validate the products that are delivered from this specific location.

Receipt Order:
When receiving a product in stock, you need to select the destination location. Once done, you can either make it enter the main location of the transfer, for example WH/Stock, or enter a sub-location of the main location.
Customer
Customer management
Click on Contact -> Create
Add Customer name, email, addresses, also pricelist, etc...

Import and Export
Select the Customers from the list view which you want to export.
Click on Action -> Export, Choose fields to get field details.
Same as changing data in a sheet or adding new customer details to import.
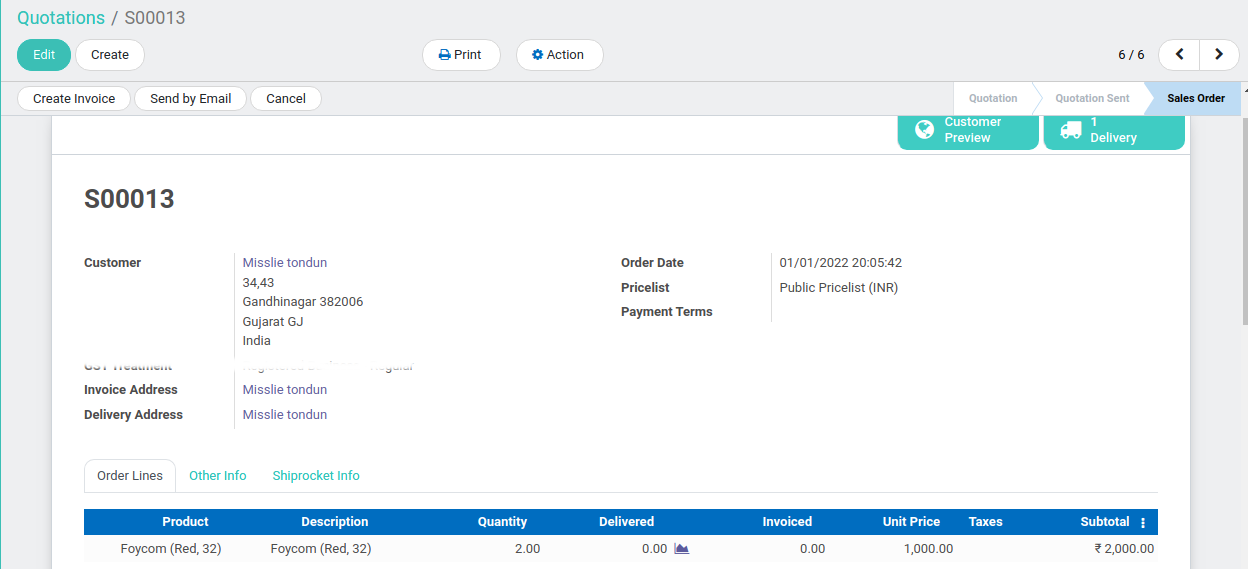
Sales Order Management
Processing order
When a customer buys something from your online store, it appears as a new order in the Orders in Sales app.
Fulfillment order
After your customer places an order, you need to prepare and deliver the items in it. This process is referred to as order fulfillment.
The fulfillment process usually includes the following:
-
picking and packaging products in an envelope or box
-
labelling the order for shipment
-
shipping the package with a mail carrier
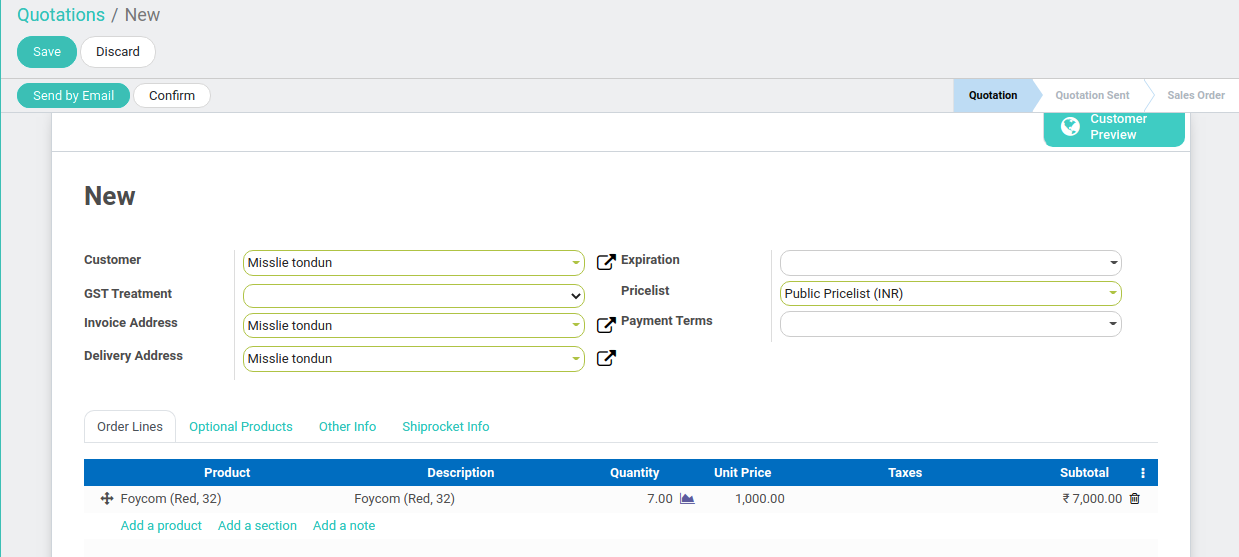
Create draft sales order
Open the Sales app -> Orders -> Quotations
Create
Quotation, choose customer, Add products to order, Send Quotation t
o get Customer approval if needed.
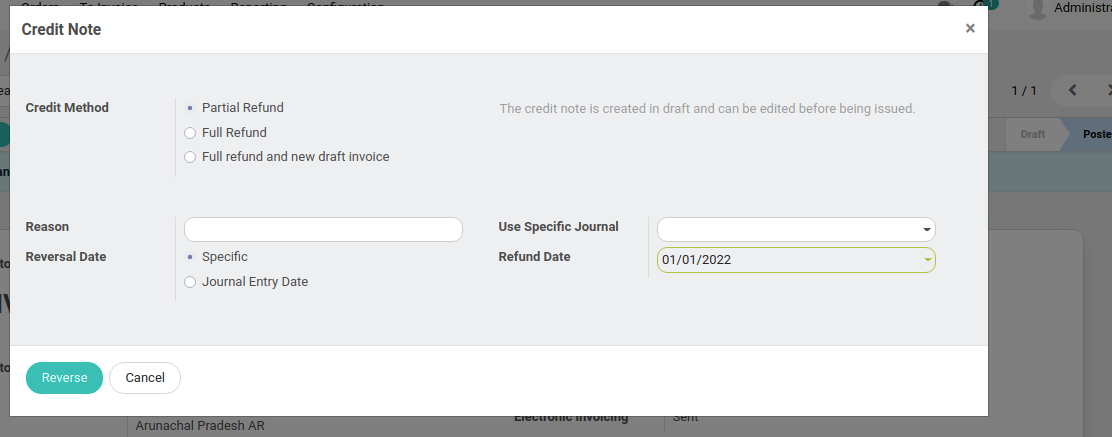
Invoice creation
Invoice based on delivered or ordered quantities
Different business policies might require different options for invoicing:
-
The Invoice what is ordered rule is used as default mode in Sales, which means that customers will be invoiced once the sales order is confirmed.
-
The Invoice what is delivered rule will invoice customers once the delivery is done. This rule concerns businesses that sell materials, liquids or food in large quantities. In these cases, the quantity might diverge a little bit and it is, therefore, preferable to invoice the quantity actually delivered.